Yummy, Yummy, Yummy! This coffee cake was even more delicious than I thought it would be! It really reminded me of the Snickernoodle Muffins I made several weeks ago. It was so moist and delicious. I loved the cinnamon streusel layer running through the middle of the cake. Everybody in my house loved this one. My little Emme was even grunting for more! Shhh....yes, I give my 11 month old cake sometimes :) This is exactly why I love muffins and coffee cakes. It gives you a legitimate excuse to eat cake for breakfast. I was tempted to plop some Blue Bell ice cream next to it! You have definitely got to put this on the weekend breakfast rotation!

2 cups all purpose flour
1-1/2 cups sugar
1 teaspoon baking powder
1/2 teaspoon salt
1/2 teaspoon ground cinnamon
2 eggs, beaten
1 cup (8-oz) sour cream
1/2 cup vanilla yogurt
1 stick butter, melted
1 teaspoon vanilla extract
Streusel:
1/2 cup packed light brown sugar
1/3 cup all purpose flour
2 tablespoons butter, melted
1 teaspoon ground cinnamon
Preheat oven to 350 degrees. Spray an 11 X 7-inch baking dish with cooking spray and set aside.
In a large bowl, combine the first five ingredients. In another bowl, combine the eggs, sour cream, yogurt, butter and vanilla. Stir into dry ingredients just until moistened.
In a small bowl, combine the streusel ingredients. Spoon half of the batter into the dish. Sprinkle with half of the streusel topping. Top with remaining batter and streusel. Bake at 350 for 35-45 minutes or until a toothpick inserted near the center comes out clean. Place pan on a wire rack to cool.
Enjoy!
(adapted from Taste of Home)
Once again, I have to say how much I enjoy Annie's Eats. That girl turns out some rockin' recipes. I really love the flavors of simple Mexican dishes. I'm a sucker for a packet of taco seasoning. Bring on the sodium! And not just any taco seasoning (I've tried them all). The best one, hands down, is the Old El Paso. I hope you've been printing the recent coupons on Coupons.com! I changed Annie's recipe up a bit and added some taco seasoning to the chicken. The random ingredient in this one is the Ranch dressing. Clay is not a fan of Ranch, so I didn't tell him it was in it. He didn't know the difference and loved it :) This is not your traditional enchiladas. This is quick, easy, creamy, cheesy, and delicious. The best part is its made from stockpile staples! Go ahead and put this one on the Menu this week. You know you want to!

4 boneless skinless chicken breasts
1 packet of taco seasoning
1 cup light sour cream
1 cup Ranch dressing
flour tortillas (I used the fajita size, about 12)
salsa
4 cups shredded cheese (cheddar or Mexican blend)
Trim chicken breasts of excess fat and cut into bite-size pieces. Season with salt and pepper. Heat 1 tablespoon olive oil in a large skillet and saute the chicken until cooked through, about 10 minutes. Add in taco seasoning and a few tablespoons of water. Cook chicken until all of the water is absorbed. Reduce the heat to low to keep warm.
Meanwhile, mix up the sauce. In a large bowl, combine half of the sour cream with half of the Ranch dressing. In a small bowl, combine the remaining sour cream and Ranch dressing. Stir both until well combined. Add the chicken to the large bowl and mix until the chicken is well coated.
Preheat the oven to 375 degrees. Grease a 9 X 13-inch baking pan. Take one tortilla and top with a little less than 1 teaspoon of the sauce from the small bowl. Spread it around the tortilla like you would sauce on a pizza. Line the center of the tortilla with a row of the chicken mixture. Top the chicken with salsa and shredded cheese, to taste. Roll up the tortilla and place seam side down on the baking dish. Repeat with remaining tortillas until the pan is full.
Spread some of the leftover sauce over the tops of the enchiladas and top with more cheese. Bake in the preheated oven for 25 minutes, or until tortillas have reached desired crispness. Serve with Mexican rice and veggies if you like that kind of stuff.
Enjoy!
(adapted from Annie's Eats)
I love baking. Some people can cook, but they don't bake. Baking takes more time and precise measuring. I love baking because you can do it when you wake up, in the middle of the afternoon, or at midnight. It fills the house with a smell that is pure happiness. I wanted to make something for my brother's birthday. I knew he wouldn't like Pinkalicous cupcakes, so I decided to ask him what he wanted. Anything...name it and I'll make it. He said chocolate cake. Done. Now begins the search for the perfect recipe! I searched out a few and then decided to go with one of my favorites, Joy the Baker. And how could I go wrong when she calls it "The Best Chocolate Bundt Cake Ever". Yes, I knew this would be smashing. This is the best chocolate cake I have ever had. And I'm very proud that I baked it!

For the cake:
1-1/4 cups plus 1 tablespoon brewed coffee
3/4 cup cocoa powder (I used Hershey's)
2-1/4 cup sugar
1-1/4 teaspoons kosher salt
2-1/2 teaspoons baking soda
2 whole eggs
1 egg yolk
1-1/4 cups plus 1 tablespoon buttermilk
1 cup plus 2 tablespoon vegetable oil
1-1/2 teaspoons vanilla extract
2-1/2 cups, plus 2 tablespoons all purpose flour, sifted
For the glaze:
6 oz. unsweetened chocolate
3/4 cup unsalted butter
3 cups powdered sugar
1/2 cup sour cream, at room temperature
1/4 cup brewed coffee, cooled (plus more if needed)
Place an oven rack in the center of the oven and preheat to 350 degrees. Grease and flour a 10-inch Bundt pan and set aside.
To make the cake batter: Put brewed coffee and cocoa powder in a small saucepan and bring to a boil, whisking frequently. Remove from the heat and let come to room temperature (I let mine sit for almost an hour).
In the bowl of a stand mixer fit with a whisk attachment, mix together sugar, salt, baking soda, eggs and egg yolk on low speed for about 1 minute. Add the buttermilk, oil and vanilla extract and mix on low again for another minute.
Add the flour and mix on medium speed for 2 minutes. Add the cooled cocoa mixture and mix on medium speed for 3 minutes. *The batter will be very loose*. Pour into the prepared cake pan and bake for 1 hour, or until a cake tester inserted in the cake comes out clean.
Let the cake cool completely in the pan and then invert onto a cooling rack. (I made my cake the day before and glazed it the day-of.)
To make the icing: Chop the chocolate into small pieces, put them in a heatproof bowl (or a double boiler), and set the bowl over a pot of barely simmering water. Be sure that the bottom of the bowl does not touch the boiling water. Remove the bowl from the heat when all of the chocolate bits have melted.
Melt the butter in a separate pan or the microwave. Whisk the melted butter into the melted chocolate until thoroughly incorporated. Sift in half of the powdered sugar. Add the sour cream and whisk to combine. Sift in the remaining powdered sugar and whisk until smooth. The glaze should be thick and shiny. Lastly, add the coffee and whisk to create a glossy glaze.
Pour the glaze over the Bundt cake, covering it completely. Leave at room temperature until ready to serve.
 The glaze was WONDERFUL! For those that are not coffee lovers, don't worry. You don't taste the coffee one bit. Coffee brings out the chocolate's natural flavors, so its a great pairing. Its not at all coffee-tasting.
Happy Birthday Chaz!

Enjoy!
(adapted from Joy the Baker)
This is an ode to those good 'ole childhood days of Hamburger Helper. Or maybe I should say good 'ole college days of Hamburger Helper, being that I never ate it until then! I will admit that I have a couple of boxes in the pantry for emergency dinner nights when I'm good with a bowl of cereal, but Clay must have meat. It does come in handy. I must say, though, that this tastes much butter and is not any more difficult to fix. All of the ingredients are sale staples and you should have most of everything in your pantry. I know I did. This is great for busy weeknight meals because its something the whole family can enjoy.

1 lb. ground beef or turkey
8-oz. short pasta (I used macaroni)
1 small onion, chopped
1 garlic clove, minced
1 14-oz. can diced tomatoes, drained
1 packet taco seasoning (check out this recipe!)
3-oz. cream cheese
1/2 cup sour cream
salt and pepper
shredded cheddar cheese (optional...I ran out)
Bring a large pot of water to a boil. Cook pasta according to package directions. Drain reserving 1/2 cup of pasta water. Set aside. *I forgot to reserve the pasta water, so I just substituted 1/2 cup chicken broth when it is needed later*
Meanwhile, in a large skillet or saute pan, cook the ground meat over medium-high heat until no longer pink. Drain off any excess fat. Add the chopped onion and garlic to the skillet and cook 5 minutes until the onion begins to soften. Mix in the diced tomatoes and taco seasoning and let simmer over medium heat for about 5 minutes. Stir in the cooked pasta, cream cheese, sour cream and reserved pasta water (chicken broth in my case). Continue to stir until the cream cheese is melted and the sauce is well blended. Season with salt and pepper to taste. Simmer over medium-low heat 3-5 minutes to reduce the sauce a bit. Remove from heat and top with shredded cheese if desired.
Enjoy!
(adapted from Annie's Eats)
Let me start out by saying how incredibly full I am! Today has been filled with great things to eat. I need to pull out the stroller and push the girls around the neighborhood tomorrow! First, it was the Snowball Cookies I snacked on all afternoon. Then, it was the delicious BBQ Rub Ribs and Corn Bread Bites! In the words of our friend, Robbie, "These are the best ribs I've had in a long time!" They were delicious, if I do say so myself. Ribs are not on the top of my list of favorite things to eat, but they will be after today. These are simple and fuss-free. Quick and easy. And the little Corn Bread Bites are just so darn cute. My husband would have preferred me to leave out the green onions, but I loved the flecks of green color it gave the muffins. This is the perfect recipe to get the grill going outside for a cookout with friends. They will love you even more than they already do. I know Robbie does!

BBQ Rub Ribs
Baby Back Ribs (I purchased 3 slabs- 1 pack- from Sam's at $2.98 lb)
Stubb's BBQ Rub (found mine at Bruno's)
Salt
Worcestershire Sauce
Take the ribs out of the plastic and rinse in the sink. Pat dry. Season both sides lightly with salt. Then generously season with the Stubb's Rub (this rub is also great for roasting potatoes in the oven). Flip over so that the "meaty" side is facing up. Sprinkle with the Worcestershire Sauce and rub slightly. Let them sit on the counter for about 10 minutes while the grill is heating up.
Put the grill on low heat (I use a propane grill). Grill the "meaty" side down first for about 15 minutes or until browned. Flip over and grill another 10 minutes or until browned. At this point, transfer the ribs to the top rack of the grill to get off of the direct heat. Leave on the grill another 15-20 minutes or until cooked through. If you don't have the small top rack on your grill just turn off some of the flames and leave the ribs on the grill away from the direct heat. Remove the ribs from the grill onto a platter and let rest on the counter for about 10 minutes covered loosely with foil. Cut and serve!

Corn Bread Bites
2/3 cup all purpose flour
1/2 cup yellow corn meal
1 tablespoon sugar
1-1/2 teaspoons baking powder
1/4 teaspoon salt
1/2 cup shredded cheddar cheese
1/2 cup reduced-fat sour cream
1/4 cup thinly sliced green onion
1 cup cream-style corn
1 large egg, lightly beaten
Preheat oven to 375 degrees. Combine flour, corn meal, sugar, baking powder and salt in a large bowl. Combine cheese and remaining ingredients in a small bowl; stir with a whisk. Add to flour mixture; stir just until moistened.
Divide batter evenly among miniature muffin cups coated with cooking spray (it will fill 36 cups- my pan only had 24 so I had some batter leftover. It also fills 12 standard muffin cups). Bake at 375 for 10-12 minutes or until golden brown. Cool in cups 2 minutes then move to wire racks.
Enjoy!
(Corn Bread Bites adapted from Cooking Light)
Last weekend we went to the beach with some friends and stopped by LuLu's on the way home. I don't eat out a whole lot, because unless its one of the expensive restaurants (hum... the Wash House!) then I feel like I could just cook it better at home and save the money. I've been disappointed the last few times I've been out to dinner. But take me to the Wash House and I'm a happy girl! I need to recreate their Key Lime Bread Pudding. Its to die for! But I digress. When we were at LuLu's the Fish Tacos stood out to me. I've seen lots of recipes and I've been wanting to try them. But as soon as I saw you could substitute chicken, I was sucked in. Fish is not something I eat a lot of, and I was afraid once it was in front of me I wouldn't like it. I didn't want another bad eating out experience. So, I substituted chicken. They were fabulous! They had black beans, chipotle cream sauce and cabbage instead of lettuce. I was in Heaven. Publix had a lot of the key ingredients on sale this week making it a great time to recreate it at home! These were not easy to eat. If you make them for a guy or a girl that you're trying to impress, you might want to hold off until the third or fourth date. I've been married long enough, so Clay didn't care that I was eating like a child!

1 lb. chicken breasts, cut into bite-size pieces (I used 3)
1 can black beans, drained and rinsed
1/4 cup salsa
2/3 cup water
1 packet taco seasoning (use Old El Paso) (Coupon Here)
1/3 cup plain Greek yogurt (Coupon Here)
1/3 cup sour cream
1/3 cup mayonnaise
1 teaspoon chipotle pepper in adobo, finely chopped (plus 1/2 teaspoon of the sauce)
8 small flour tortillas (I used fajita-size)
shredded cabbage (could substitute lettuce)
shredded cheese
avocados (optional...added mine after the picture)
Heat a large skillet over medium heat. Add a splash of olive oil. Saute chicken until no longer pink, about 8 minutes. Add black beans, taco seasoning and water (the Old El Pasa taco seasoning is worth the little bit of extra it costs. The McCormick taco seasoning was yucky. I've put the ones I bought in my donation bin!). Cook uncovered over medium heat about 5 minutes until thickened. Add salsa. Stir to combine. Cover and simmer over low heat about 10 minutes.
In a small bowl, combine yogurt, mayonnaise and sour cream. Remove the seeds from one pepper and finely chop. Add to the bowl. Add in about 1/2 teaspoon of the sauce from the can of peppers. This stuff is HOT! You could add more to your taste. Be sure to wash your hands after handling the peppers. Put the sauce in the fridge until you're ready to use.
Now its time to assemble the tacos. Put about 1/4 cup chicken mixture in the center of the tortilla, top with the chipotle cream sauce, cabbage and shredded cheese. I also added avocado to mine after I took the picture. YUM! You can also add more salsa if you'd like. Mine was hot enough from the chipotle cream sauce! Dig in!
Enjoy!
(inspired by the Fish Tacos at LuLu's)
 Ella playing on the beach before heading to LuLu's. I am devastated about the oil situation out in the Gulf! There are so many ways to get involved. Check with your local organizations to see how you can get involved if needed!
I made this right before Easter, but forgot to post it! I love taco salads, as you know, and this is a lot like one. Only this one is served with noodles instead of chips. My husband wasn't sure if he was going to like it. He loved it! Put this one in the dinner rotation!

1 box penne noodles (preferably whole wheat)
1 lb. ground beef
1 medium onion, diced
3 garlic cloves, minced
1 packet taco seasoning (I only had fajita seasoning)
1/4 cup tomato paste
1-1/2 cups chicken broth
2 cups shredded cheese
2 plum tomatoes, seeded and shopped
1/4 head iceberg lettuce or chopped romaine lettuce
Bring a large pot of water to a boil, salt it, add the pasta and cook until al dente. Drain and return to pot.
While the pasta is cooking, heat a skillet and brown the beef over medium heat. Cook until no longer pink. Drain off excess fat. Add three-quarters of the onion, garlic and taco seasoning. Cook until the onion of softened, about 6-7 minutes. Stir in the tomato paste for 1 minute, then stir in the chicken broth.
Add the meat sauce to the pasta and toss. Spoon into a serving dish, top with the cheese and tent with foil to melt the cheese, about 1 minute. Top with the remaining onion, the tomatoes and lettuce. Add sour cream and olives like I did!
The only thing I regret is forgetting to put away the leftovers. I woke up to the pot still sitting on the stove! I was SO mad! UGH
Enjoy!
(adapted from Rachael Ray Magazine)
This is another brunch recipe that's quick and easy. Its prepared the night before and stuffed in the fridge overnight. English muffins always go on sale in the grocery stores. This is the time of year for asparagus and if you have leftover Easter ham try it out on this (that is, of course, if you didn't make this for Easter!) I roasted my asparagus to get the most flavor out of it. Trim off the tough ends, toss with olive oil and salt and pepper, and roast in a 425 degree oven for about 10 minutes. If you like asparagus, try it out in a dish like this!

4 English Muffins, torn into bite size pieces (4 cups)
2 cups cubed cooked ham (10 oz)
2 cups cut up fresh cooked asparagus (I roasted mine)
4 oz. shredded Swiss Cheese (I used Mozzarella)
4 eggs, beaten
1/4 cup sour cream
1-1/4 cups milk
2 tablespoons finely chopped onion (I omitted this)
1 tablespoon Dijon-style mustard (I omitted this)
In greased 2-qt casserole square baking dish spread half the muffin pieces. Top with ham, asparagus, and cheese. Top with remaining muffin pieces.
In bowl, whisk together eggs and sour cream. Stir in milk, onion, mustard and salt and pepper. Pour over layers in dish. Cover and chill for 2-24 hours (I did mine overnight).
Bake, uncovered in a 325 oven (mine was set to 350. If you do this watch the baking time) for 60-65 minutes or until internal temperature reads 170 (I see if its golden and it its set in the center). Let stand 10 minutes before serving.
Enjoy!
(adapted from Better Homes & Gardens)
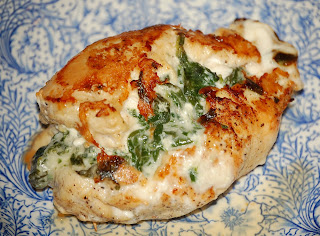
I almost didn't make this tonight. I still needed to get baby spinach at Publix because they were out when I did my shopping last Thursday. The weather was starting to get bad and I just didn't want to get out. But, I had really been looking forward to this recipe. I am really glad I braved the rain and made this. Awesome! It really tasted like it came from a restaurant. I kept it simple and served it with Rice-a-Roni and green beans. The original recipe had bacon wrapped around each chicken breast. I didn't have any, but feel free to try it that way! Since I didn't use the bacon, I seared both sides in a skillet and finished it in the oven. See the original link if you want to try the bacon. This would be perfect for entertaining. It is so pretty with the green spinach and cheese coming out! And be sure to pound the chicken breasts out thin enough. The thinner you pound them, the quicker they will cook. It also helps when trying to wrap them around the filling to close.
1 10-oz. bag fresh baby spinach
1/2 cup sour cream (I used light)
1/2 cup shredded cheese (mozzarella or monterrey jack)
2 cloves garlic, minced
4 boneless chicken breasts- pounded to 1/4" thickness
salt and pepper
Preheat the oven to 450 degrees. Place spinach in a large glass bowl, and heat in the microwave for 2-3 minutes, stirring at 1 minute intervals, until wilted. Stir in sour cream, shredded cheese and garlic.
Lay the pounded chicken breasts on a clean surface. Season with salt and pepper. Spoon the spinach mixture onto each one. Roll up chicken to enclose the spinach. Secure with toothpicks. Sear in a large skillet over medium-high heat for 5 minutes on each side. Finish cooking in a 450 degree oven for 10-15 minutes until no longer pink. When you take the pan out of the oven be sure to put an oven mitt over the handle so you don't burn yourself, because that handle is HOT! I have burned myself a countless number of times from touching the handle.
Enjoy!
(adapted from AllRecipes.com)
I know we all stocked up on the Hidden Valley Ranch Dressing while it was B1G1 this week. I also stocked up on the Pillsbury Biscuits, so when I saw this recipe in Taste of Home I knew I had to give it a whirl. Its the same basic concept as my other "taco" dishes, but I LOVED the idea of using the biscuits to make flatbread. It was so yummy!

1/2 cup sour cream
1/4 cup Ranch Dressing
1 lb. ground beef
1 15-oz can black beans (or pinto beans)
1 envelope taco seasoning
1 cup salsa (or one can diced tomatoes, undrained)
1 tube large refrigerated biscuits (8)
Toppings:
Shredded Cheese
Shredded Lettuce
Extra Salsa
Sliced Olives
Avacado with Lime (Yum)
In a small bowl, combine the sour cream and ranch dressing. Chill until ready to serve.
In a large skillet, cook beef over medium heat until no longer pink; drain off any excess fat. Add the beans (drained) salsa and taco seasoning. Heat through. Cover and simmer over low.
Meanwhile, roll out each biscuit into a 6-inch circle. In a small non-stick skillet over medium heat, cook each biscuit for 30-60 seconds on each side or until golden brown. Keep warm in a 200 degree oven. Work with these one at a time. Roll one out and put in the skillet. While that one is cooking roll the other one out. Roll them out as thin as you can. You want them to cover the bottom of your small skillet.
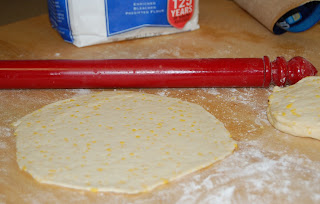 Yes, you are looking at that picture right. I, for some reason, do not own a rolling pin. I deconstruct my paper towel holder when I need to roll something out! It gets the job done!
To serve, spread each flatbread with 1 tablespoon ranch sour cream; top with 1/4 cup meat mixture. Sprinkle with desired toppings. You can even leave them flat and build almost like a pizza.
Enjoy!
(adapted from Taste of Home)
Yep. The title says it all. These ARE the best blueberry muffins. I changed it up a bit by adding some cranberries and using frozen blueberries. But this guarantees that these can be made year round. Keep the blueberries in the freezer and your Craisins stocked, and you've got wonderful blueberry muffins ready at all times! I've even made these with a pecan streusel topping before, but decided to leave that off this morning. My little family wasn't worthy of those "special" muffins this morning! Next time maybe. I'm going to take some to the office in the morning to share. This would make a great special treat for your child's teacher for Valentine's Day too. They all get tons of chocolate. Some fresh blueberry muffins would be great!

1-1/2 sticks butter, softened
1-1/2 cups sugar
3 large eggs
1-1/2 teaspoons vanilla extract
1 cup sour cream
1/4 cup milk
2-1/2 cups all-purpose flour
2 teaspoons baking powder
1/2 teaspoon baking sodea
1/2 teaspoon kosher salt (this is the only salt I ever use)
1-1/2 cups frozen blueberries (NOT thawed)
1 cup dried cranberries
Preheat the oven to 350 degrees. Spray 24 muffins cups with cooking spray or line with paper liners.
With an electric mixer, cream the butter and sugar until light and fluffy, about 5 minutes. With the mixer on low speed, add the eggs 1 at a time, then add the vanilla, sour cream and milk. In a separate bowl, combine the flour, baking powder, baking soda and salt. With the mixer on low speed add the flour mixture to the batter and beat until just mixed. Fold in the blueberries and cranberries with a spatula and be sure the batter is completely mixed (keep the blueberries frozen until ready to use so they don't turn the batter purple any more than necessary).
Scoop the batter into the prepared muffin pans, filling each about 2/3 full. Again, if you have not invested in the Large Scoop from Pampered Chef, you ought to. It is perfect for filling muffin cups. Bake for 25-30 minutes, until the muffins are lightly browned on top and a toothpick comes out clean.
 I love how you can really see the blueberries and cranberries on the bottom of the muffins!
Enjoy!
(adapted from Ina Garten on FoodNetwork.com)
This is such a great recipe! Especially with the Super Bowl around the corner. Not to mention, it puts those Tostitos Scoops to good use! I found this one several years ago and have made it a couple of times before. It only calls for a handful of ingredients, all of which I had on hand (except the chives, but I just left them out).You can add so much to these and really jazz them up. See below the recipe for some of my suggestions and how I changed it up tonight. One of the comments on the Rachael Ray site said they used biscuits shells like the Taco Puffs and filled them with this cheesy filling. What a great idea! I saved some of the filling and will do that on Saturday! I'll update this with the details.

8 oz. cream cheese, softened
1 cup shredded pepper jack cheese (or whatever you have)
1 large egg
1/2 cup frozen corn kernels (I used canned)
48 Tostitos Scoops
chopped chives or cilantro, for garnish
Preheat oven to 350 degrees. In a large bowl, mix the cream cheese, pepper jack cheese, egg and corn (I used my stand mixer).
Arrnage the chips on a large rimmed baking sheet and place 1 teaspoon corn mixture in each. Bake until the filling sets. About 20 minutes.
Sprinkle the corn bites with the chives; serve warm.
**I sauteed some diced chicken breasts (2) with taco seasoning. I wasn't sure how I was going to work it, but I ended up topping the corn bites with a chunk of the seasoned cooked chicken after they came out the oven. YUM-O! You could really dress it up however you like. Add the chives, a pickled jalapeno, some sour cream, maybe a slice of an olive...its endless! Put this one on the Game-Day spread!!
 Enjoy!
(adpated from Rachael Ray Magazine)
These potatoes turned out so pretty! This is definitely one you could make when you have guests. I served it with seared chicken breasts, but it would be GREAT with a steak. If you don't groove on mushrooms, you could certainly leave them out. I happen to love them. I will enjoy one for lunch tomorrow! Right now Publix has their potatoes, broccoli and mushrooms on sale. Ella loved this. Go figure! Sometimes I have a hard time getting her to eat green beans. Put broccoli, cheese and mushrooms in a potato and she eats it up!
 2 baking potatoes (I used 3 smaller-sized russets)
1 cup broccoli florets (I steamed mine before mixing them)
1 cup sliced fresh mushrooms (I used an 8-oz. container)
1 clove garlic, minced
1 tablespoon butter
1 teaspoon olive oil
1/2 teaspoon Worchestershire Sauce
salt/pepper
2 tablespoons butter
3 tablespoons milk
1/4 cup sour cream
1/2 cup mozzarella or other white cheese, shredded
Parmesan cheese
Preheat oven to 450 degrees.
Pierce potatoes with a fork; arrange on paper towels in the microwave. Microwave on High 16 minutes, rotating and flipping in 4-minute intervals. Let stand 5 minutes.
While the potatoes cook, melt 1 tablespoon butter and 1 teaspoon olive oil together in a large skillet. Add the mushrooms and garlic and cook for approximately 8 minutes or until tender, stirring frequently. Add Worcestershire sauce, broccoli, salt and pepper. (If you don't steam your broccoli add it in the beginning with the mushrooms, so it has time to soften). Remove from heat.
Cut each potato in half lengthwise; scoop out pulp, leaving 1/4-inch-thick shell. Put pulp in a medium bowl and mix in the milk, 2 tablespoons butter, sour cream, cheese and salt/pepper. Mash with a fork or potato masher until blended. Add to the broccoli mixture and stuff into the potato shells. Sprinkle with Parmesan cheese.
Bake in a 450 degree oven for 10 minutes or until light golden on top.
Enjoy!
(adapted from Cooking Light)
My Mom makes this casserole quite a bit. She usually uses the frozen hashbrowns, but since the Simply Potatoes Hashbrowns were on sale this week, I was going to use those. Obviously somebody else thought that the Simply Potatoes would make a nice hashbrown casserole too, because there on the back of the bag is the recipe! This is a smaller version of my Mom's. Her recipe fills a 9 X 13 casserole, but this recipe is a smaller version perfect for a weeknight meal. I have made it before when I did Breakfast for dinner for my father-in-law. It was great with eggs. My Mom serves this Christmas Day evening with our beef tenderloin dinner. It is an all around crowd pleaser and very yummy, perfect for the upcoming Holidays. I will post a picture when I get this made. I am tentatively putting it on the Menu for Wednesday, since I won't get to Publix for the new sale until Thursday!
Hashbrowns:
1 package Simply Potatoes Shredded Hash Browns
1 can Cream of Chicken soup
2 cups shredded cheddar cheese
3/4 cup sour cream
1/4 cup chopped onion (I omit this, or saute first before mixing)
1/4 cup butter, melted
Topping:
1-1/2 cups corn flakes, coarsely crushed
1/4 cup butter, melted
Heat oven to 350 degrees. Spray an 11 X 7-inch rectangular dish or an 8-inch square dish with nonstick cooking spray. In a large bowl combine all hash brown ingredients; mix well. Spread into prepared baking dish.
In a small bowl stir together topping ingredients. Spread topping evenly over hash browns. Bake 45 minutes or until hash browns are tender.
**This casserole freezes well. You could double this and freeze one casserole to eat later. With the Hash Browns B1G1 this week, it would be economical to do so. Also, the only time I use Corn Flakes is for this casserole. I put the cereal in a large zippy bag so that it stays fresher longer stored in the box!
Enjoy!
(from Simply Potatoes)
This recipe started out years ago as a blueberry dessert. Over the years, my Aunt Tammy and my Mimi have transformed it into a delicious cranberry dish. We serve it on the plate with our Thanksgiving turkey, but it definitely could be used as a dessert too. I love the texture of the cranberries, pineapple and pecans in the jello. This would also be great around Christmas. The red is so festive!

I have used an (*) to mark the sale items at Publix. These will run through tomorrow, Nov. 25th.
First Layer:
2- 3 oz. packages cranberry jello
2 cups boiling water
1 can whole cranberry sauce *
1- 8 1/2 oz. can crushed pineapple * (20 oz. can on sale)
1/2 cup chopped pecans
Dissolve Jello in boiling water, add cranberry sauce, pecans and pineapple, including the juice. Pour into a 2 quart, flat serving dish. Cover and chill until firm.
Topping:
1- 8 oz. package cream cheese *
1/2 cup sugar *
1/2 cup sour cream *
1/2 teaspoon vanilla
1/2 cup chopped pecans
Combine cream cheese, sugar, sour cream, and vanilla. Beat with a mixer until smooth (about 2 minutes). Spread over congealed layer, then sprinkle with chopped pecans.
Happy Holidays!
This is another great recipe that utilizes ingredients that are on sale this week at Publix. The Campbell's soup ($.80 each + coupon HERE), Mueller's pasta (B1G1), and Stovetop Stuffing (B1G1). I received this recipe from one of my Mom's Bunko friends on an online recipe swap a couple of years ago. It is so good. I have also made this and divided the stuffed shells in freezer bags and put in the freezer for an easy pre-made weeknight meal. Just top it with the soup right before baking!
4 chicken breasts
1 Box Jumbo Shells
3 Cans Cream of Chicken Soup (I use 98% fat free)
1 1/2 can Water
1 Cup Mayo (I use light)
1 Cup Sour Cream (I use light)
1 Box Stovetop Stuffing
Cook chicken, shred or dice. Prepare stuffing mix. Add chicken, sour cream and mayo. Cook shells. Stuff with chicken mixture. Layer stuffed shells in a single layer in a 13 X 9 baking dish. Mix soup with 1 1/2 cans of water. Pour soup mixture over shells. Cover and bake for 1 hour at 350 degrees.
(If frozen: layer frozen shells in a single layer, cover with soup/water mixture, cover with foil, and bake in 350 degree oven for 90 minutes or until bubbly.)
This is great served with green beans or a light salad. You guys are going to love this one. Its a favorite in my house!


